Load balancers are a core component of modern web applications. They help distribute incoming traffic across multiple servers, improving scalability, reliability, and performance. In this blog, we'll understand the basic idea behind them by building a simple one using Express.js.
What problem are we solving?
Imagine you built a website, and over time it became popular with many users. One day, your server crashed because it was overwhelmed by a massive number of incoming requests. The high volume of traffic exhausted the server's resources, causing the service to become unavailable.
Restarting the server might bring the website back online temporarily, but the same problem will occur again whenever traffic spikes. So, how can you prevent this from happening?
Clearly, relying on a single server doesn't scale. A straightforward solution is to run multiple web servers instead of just one. This allows the incoming traffic to be shared among several machines, reducing the load on each server.
But this raises another question: Which server should handle each incoming request?
That's where a load balancer comes in. A load balancer sits between clients and your backend servers, receives every incoming request, and decides which server should handle it. By distributing requests efficiently, it prevents any single server from becoming overloaded and keeps your application available even under heavy traffic.
Didn't understand the problem?
Imagine a restaurant with only one waiter taking orders. When there are just a few customers, everything runs smoothly. But as the restaurant gets busier, one waiter can't handle every table, leading to long waits and slow service.
The obvious solution is to hire more waiters. Now the workload is shared, and customers are served much faster. A load balancer works in a similar way: it distributes incoming requests across multiple servers instead of sending them all to just one.
The architecture
A load balancer is a type of reverse proxy.
A reverse proxy is a server that sits in front of your backend servers. Clients send requests to the reverse proxy, and it forwards them to the backend server. The client never communicates with the backend servers directly.
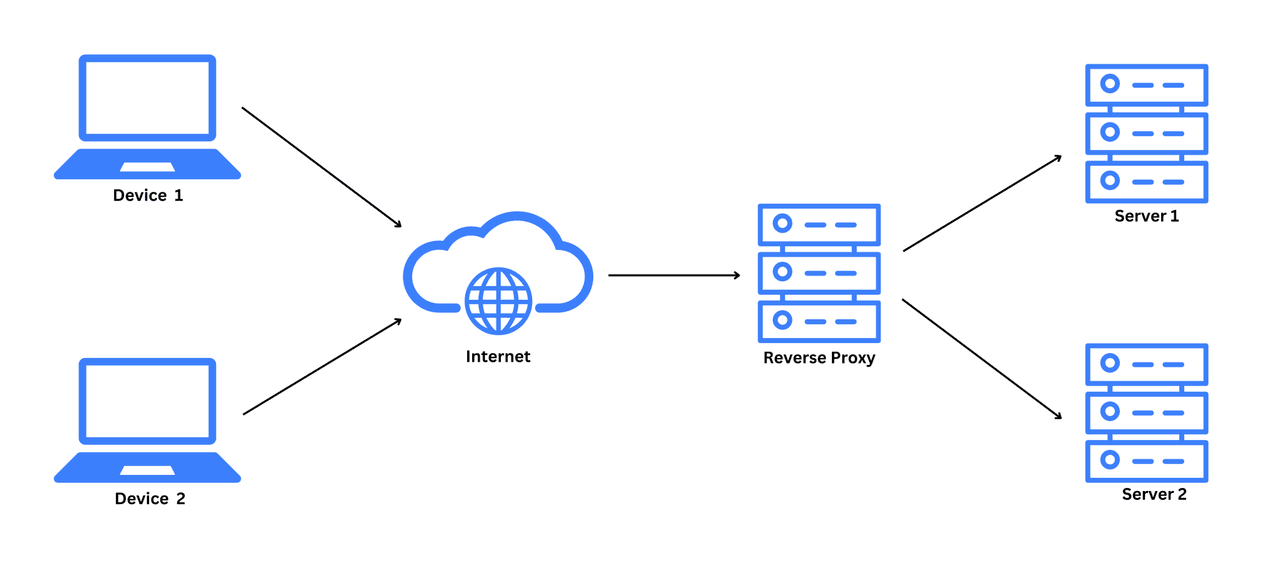
Reverse proxies are commonly used for load balancing, security, caching, etc. Common load balancers are NGINX, HAProxy, AWS ALB, Google Cloud Load Balancing service, etc.
How does a load balancer works?
A simple load balancer receives incoming HTTP requests from clients, forwards each request to one of the backend servers, and returns the server's response back to the client. You can think of it as a middleman that sits between clients and your servers, passing requests and responses back and forth.
But how does it decide which server should handle a request? To make this decision, load balancers use scheduling algorithms such as Round Robin, Least Connections, Least Response Time (Latency), and others. These algorithms help distribute traffic efficiently across the available servers.
Let's make a simple HTTP load balancer using Express.js
First, make sure you have Node.js installed. If not installed, install it here.
Create a new directory and run npm init -y.
Install Express.js using NPM:
npm i expressNow, create a file named server.js and add the following code:
const express = require("express");
const app = express();

const PORT = process.env.PORT || 3000;

app.get("/", (req, res) => {
  res.send(`Hello from server running on port ${PORT}`);
});

app.listen(PORT, () => {
  console.log(`Server listening on port ${PORT}`);
});
At this stage, this is just a simple Express.js web server, not a load balancer. We'll keep this code as our test web server. Now, make a copy of this file and save it as balancer.js. We'll modify this new file to turn it into a load balancer.
To begin, let's create a list of backend server addresses. We'll use ["<http://localhost:3001>", "<http://localhost:3002>", "<http://localhost:3003>"] as our servers and maintain a pointer idx, initially set to 0, to cycle through them one by one. This algorithm is called as the Round-Robin algorithm.
const servers = [
  "<http://localhost:3001>",
  "<http://localhost:3002>",
  "<http://localhost:3003>"
];
let idx = 0;
For sending the HTTP request data to a server, we can use the fetch function:
const response = await fetch(server, {
  method: req.method,
  headers: req.headers,
});
Now, just send the response to the client: res.send(resp.body);. Make sure you wrap this in a try-catch block to prevent server from crashing when any errors are thrown.
Full code of balancer.js:
const express = require("express");
const app = express();

const PORT = process.env.PORT || 3000;

const servers = [
  "<http://localhost:3001>",
  "<http://localhost:3002>",
  "<http://localhost:3003>"
];
let idx = 0;

app.get("/", async (req, res) => {
  const server = servers[idx];
  idx = (idx + 1) % servers.length;

  try {
    const response = await fetch(server, {
      method: req.method,
      headers: req.headers,
    });

    const body = await response.text();

    res.status(response.status).send(body);
  } catch (err) {
    res.status(502).send("Backend server unavailable");
  }
});

app.listen(PORT, () => {
  console.log(`Server listening on port ${PORT}`);
});
Now, we have a server (server.js) and a load balancer (balancer.js).
Let's test our load balancer
Let's create three test servers at ports 3001, 3002, and 3003:
-
Windows:
bashset PORT=3001 && node server.js set PORT=3002 && node server.js set PORT=3003 && node server.js -
Linux/Mac:
bashPORT=3001 node server.js PORT=3002 node server.js PORT=3003 node server.js
Run the load balancer at port 3000:
node balancer.jsNow send a few requests to the load balancer using your browser or any HTTP client. You'll notice that each request is forwarded to a different backend server, following the Round Robin algorithm.
Here's the full source code repository: eswar-7116/intro-lb.
Conclusion (Don't skip if you understand)
Congratulations! You've built your very own simple load balancer and, more importantly, understood the core idea behind how it works. While our implementation demonstrates the fundamental concept, it's far from the performance and reliability of real-world load balancers like NGINX or HAProxy.
If you were able to follow along and build this yourself, great job! 👏🎉 As a next step, you can gradually improve your load balancer by adding features like:
- Request logging to monitor incoming traffic.
- Request timeouts and better error handling.
- Retry logic if a server fails to respond.
- Health checks to skip unavailable servers.
- HTTP Keep-Alive to reuse connections and improve performance.
- Rate limiting to control excessive traffic.
- Smarter scheduling algorithms such as Least Connections instead of Round Robin.
You don't have to implement all of these at once. Pick one feature at a time. You'll learn much more by building each improvement yourself. Happy coding!